Tips on building a workbench?

Gaujo

UZI Talk Supporter
Feedback: 10 / 0 / 1
Joined
Sep 11, 2013
Messages
4,191
Location
Raleigh, NC
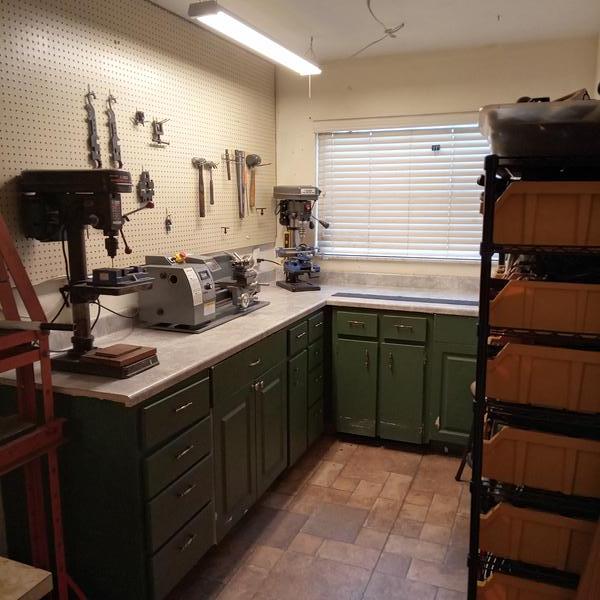
I'm planning to build my own workbench, both for gunsmithing and woodworking, and wanted to get some tips of any suggestions you have to make it the best I can.

I'm planning on an L shape like this in the corner, but maybe nicer.
8054a7a0395bb0cd091bf745b3d44606.jpg


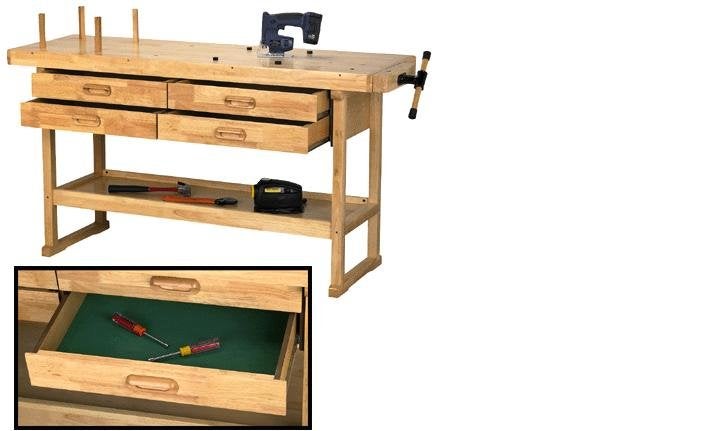
I've had this one before, but it was only good for workspace, there was no space for having something in pieces etc, so I want something bigger. I also didn't use the holes for the dogs, am I making a mistake to avoid those or can i just leave them out?
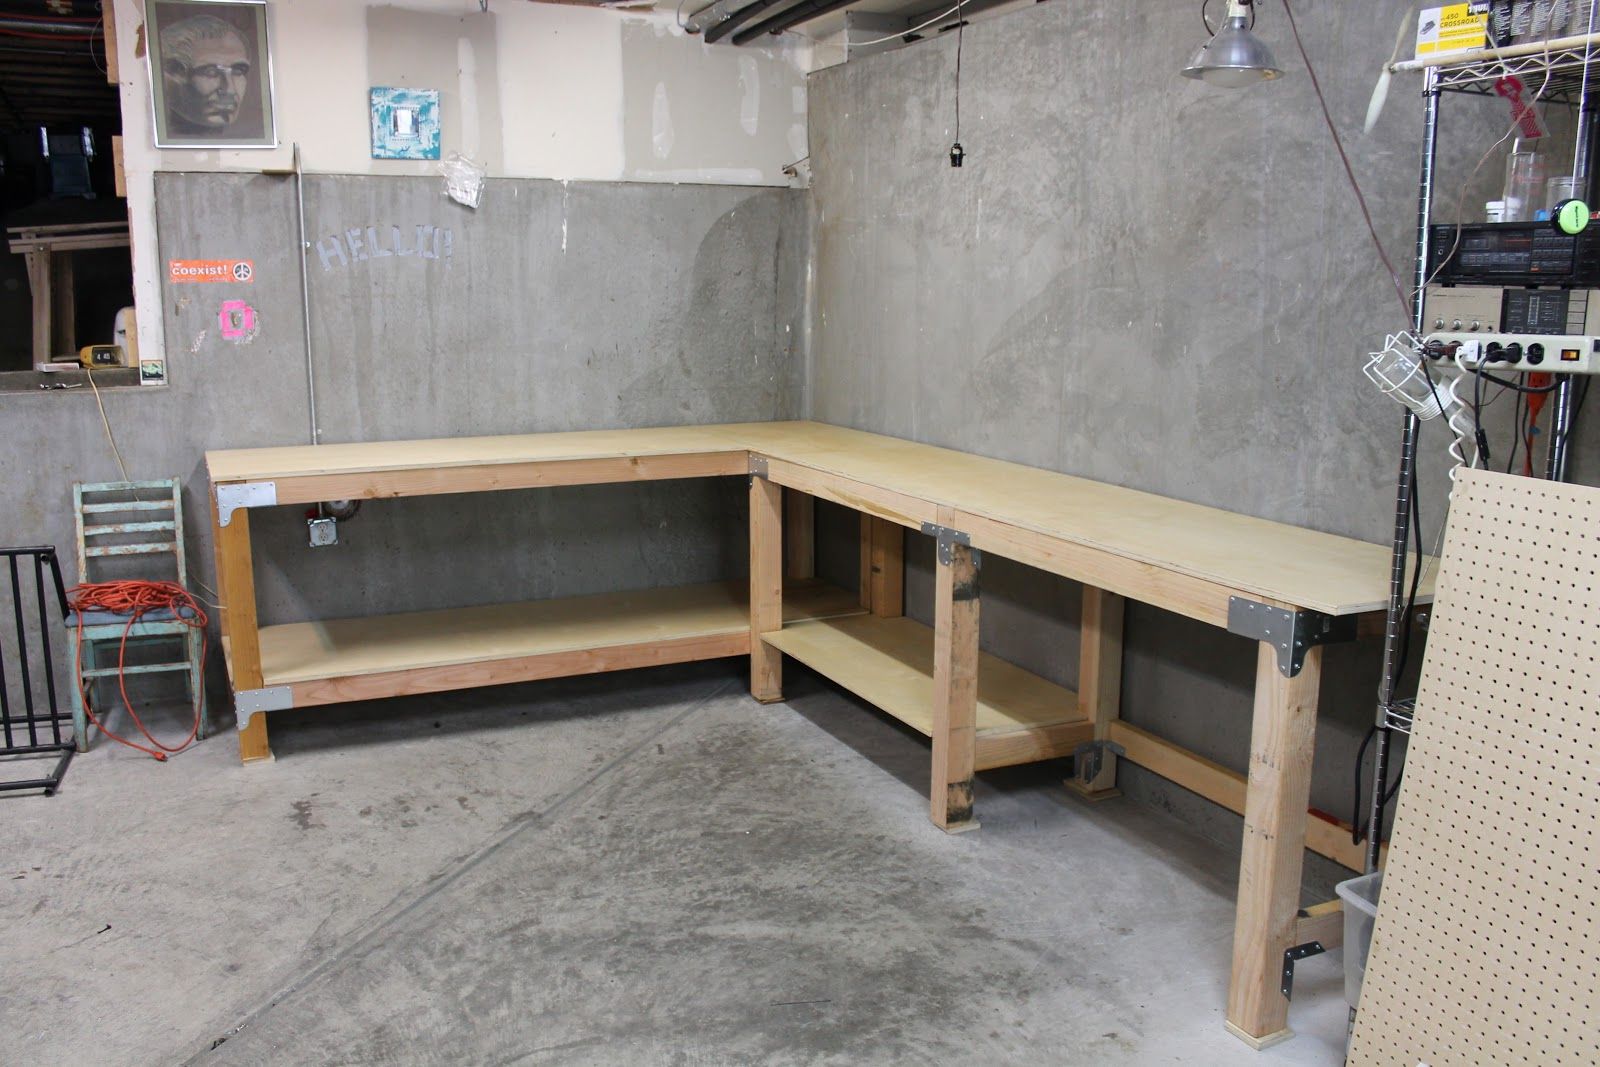
128093.jpg
 

slimshady

Well-known member
Feedback: 0 / 0 / 0
Joined
Sep 19, 2004
Messages
981
Unless you have the clamp on the end the dogs are not going to be useful. They are generally only used to secure a long board using the dogs as one "jaw" of the vise and dogs in the moveable part of the clamp make the other "jaw". There are also J shaped iron ones that allow you to hammer them down and then they jam in the hole, holding something down.

The two things to remember on building a bench are make it heavy and secure it to the structure anywhere you can. Lag bolts into the wall studs, concrete anchors or lag bolts into the floor, etc. You want to be able to put a giant vise on one corner and beat the crap out of something without the bench flexing. BTW, mounting the vise directly over a "leg" directs any downward force into the floor, not flexing the top. You might also want to make a small roll around "workstation" the same height, that way if you have something long you can position it under one end to support it. When not in use it just sits at one end of your bench and is extra storage. Plus you can roll it to your car or whatever to keep your tools and parts handy.
 

sniperdoc

UZI Talk Supporter
Feedback: 2 / 0 / 0
Joined
Jan 12, 2015
Messages
5,424
Location
TN
Before building it, work out the lighting and electrical outlet locations, as well as a vacuum system if you want one. (They are great for woodworking)
4×4s for legs, cross braces, 2×6s for the top, 3/4" plywood covering the 2×6s attached with construction adhesive. Bolt everything together vs nails or screws. As mentioned above, attach the whole thing to the floor and walls, and mount your vise, drill press, etc over a leg. You should also add shelves under it, for often used tools.
You can laminate the top, but I really don't recommend it because of chipping.
Build it in place, and make sure you build it where you want it, because it will be heavy. However, it will last a lifetime.

ETA, radius all outside corners, you'll be glad you did!
 
Last edited:

ericthered

UZI Talk Supporter
Feedback: 0 / 0 / 0
Joined
Jun 19, 2020
Messages
322
I have seen where a guy did a concrete top then epoxied it. Would give pretty good rigidity.
Drawers below are better then shelving below in my opinion. Easier to keep and organize noodly things.
 

sniperdoc

UZI Talk Supporter
Feedback: 2 / 0 / 0
Joined
Jan 12, 2015
Messages
5,424
Location
TN
I have seen where a guy did a concrete top then epoxied it. Would give pretty good rigidity.
Drawers below are better then shelving below in my opinion. Easier to keep and organize noodly things.

Re: Drawers vs Shelves; I prefer wall mounted drawers for workbenches, simply because dust tends to collect in/on everything under the table.
I personally wouldn't want a hard or abrasive surface such as concrete on a bench that would be used for gunsmithing
 

ericthered

UZI Talk Supporter
Feedback: 0 / 0 / 0
Joined
Jun 19, 2020
Messages
322
I forgot to mention with the concrete top that it gets epoxied over.
 

RWBlue01

Well-known member
Feedback: 0 / 0 / 0
Joined
Oct 31, 2012
Messages
107
I am a huge fan of using a workmate work bench for actual reloading, and wood working. It has everything I need built into it.

I cut plywood for the top and mounted my reloading equipment to it. So I can quickly remove the plywood and have a clean bench for wood working.
I bought a bag of lead shot that I put on the legs. This means the bench didn't move when I was resizing tough brass.

When I get to someplace I can reload and do woodwork again, I will buy 2-3 more. Then along the wall I will setup shelving units and fill them with lowes rugged totes for stuff, or maybe put wood for woodworking.
 

rockman96

Well-known member
Feedback: 1 / 0 / 0
Joined
Dec 31, 2010
Messages
245
I personally wouldn't want a hard or abrasive surface such as concrete on a bench that would be used for gunsmithing

I would never do Gunsmithing without a protective pad. Moreover, I wouldn't want a wood shop in the same place I am doing metal work or Gunsmithing.
 

sniperdoc

UZI Talk Supporter
Feedback: 2 / 0 / 0
Joined
Jan 12, 2015
Messages
5,424
Location
TN
I would never do Gunsmithing without a protective pad. Moreover, I wouldn't want a wood shop in the same place I am doing metal work or Gunsmithing.

1) Yes, you should use a pad, but if there's an accidental drop, scrape, etc, it's better to have that happen on wood than a hard, abrasive surface.
2) It's better to have 2 separate areas, but the OP stated that he will be using the bench for both tasks.
 

Roaster72

UZI Talk Supporter
Feedback: 4 / 0 / 0
Joined
Jun 7, 2006
Messages
433
I built 16 feet of workbench in my shop and I'm very happy with it. Here's some tips.

!. Make you lower shelf flush with the floor. In your example of corner shelves, you would be continually on your knees getting things from under the shelf. My lower is absolutely flush with the floor so nothing can get under it.
2. Install a back board on the upper and lower benches. Like above, little screws will find a way to get between the wall and the bench.
3. Do your tops with plain plywood. 1/2 inch should be sufficient, if not laminate two 1/2 inch pieces. You will eventually damage the top. If you have built it with plywood its easy and relatively cheap to replace. You also may bolt on and later remove items such as a grinder, buffer, drill press, or other item. Later when you inevitably reconfigure your workspace you can replace the tops and start anew with a clean bench. I also find myself occasionally running screws into the workbench for an impromptu jig of some sort, You won't do that with concrete.
4. Anchor the bench to the wall. I have no idea how guys use unbolted benches or worse benches on rollers. Those guys must be a lot less energetic than me.
5. Plan your bench length and double it. I thought I was great with sixteen feet. 8 feet for metal/mechanical work and 8 feet for wood. Then my reloading setup was evicted from the house to make a mother in law bedroom. I quickly found 16 feet was insufficient.

Hope those pointers help!
 

rockman96

Well-known member
Feedback: 1 / 0 / 0
Joined
Dec 31, 2010
Messages
245
1) Yes, you should use a pad, but if there's an accidental drop, scrape, etc, it's better to have that happen on wood than a hard, abrasive surface.
2) It's better to have 2 separate areas, but the OP stated that he will be using the bench for both tasks.

1) Oh, I agree completely. Either way I will use a mat.

2) Sawdust and metal working (or gunsmithing) have no place in the same area. I invested my money in metal working equipment, if I need to build a speaker cab or do other type wood work, it gets done outdoors. You're asking for aggravation and potential issues mixing them.
 

JohnnyE

UZI Talk Supporter
Feedback: 0 / 0 / 0
Joined
Mar 17, 2015
Messages
261
The top of the front bench should overhang, or extend beyond, the structural member that supports it. You want a lip that allows you to use a C-clamp to cinch something down to the bench to perform a piece of work.
 

NorincoKid

Well-known member
Feedback: 7 / 0 / 0
Joined
Nov 6, 2012
Messages
70
Location
Spring Hill, FL
Little late to the party on this one, but sometimes old kitchen base cabinets and countertop can be had for cheap....and make for a decent workspace.

XBMdAUZ.jpg
 

JohnnyE

UZI Talk Supporter
Feedback: 0 / 0 / 0
Joined
Mar 17, 2015
Messages
261
Allow the top of the bench to overhang the front stringer by at least two inches, possibly even more, that way you will have the ability to use a C-clamp to hold objects fast to the top of the bench.
 

Rob1928

UZI Talk Supporter
Feedback: 0 / 0 / 0
Joined
Sep 6, 2012
Messages
160
Location
Montana
Make any intermediate shelf high enough off of the floor to be able to store things under it. I made 24' of benches so I could slide a rubbermaid totes under the shelf that I use to store materials, bulk bullets, etc in a sorted and clean out of the way manner.
 

Gaujo

UZI Talk Supporter
Feedback: 10 / 0 / 1
Joined
Sep 11, 2013
Messages
4,191
Location
Raleigh, NC
I built 16 feet of workbench in my shop and I'm very happy with it. Here's some tips.

!. Make you lower shelf flush with the floor. In your example of corner shelves, you would be continually on your knees getting things from under the shelf. My lower is absolutely flush with the floor so nothing can get under it.
2. Install a back board on the upper and lower benches. Like above, little screws will find a way to get between the wall and the bench.
3. Do your tops with plain plywood. 1/2 inch should be sufficient, if not laminate two 1/2 inch pieces. You will eventually damage the top. If you have built it with plywood its easy and relatively cheap to replace. You also may bolt on and later remove items such as a grinder, buffer, drill press, or other item. Later when you inevitably reconfigure your workspace you can replace the tops and start anew with a clean bench. I also find myself occasionally running screws into the workbench for an impromptu jig of some sort, You won't do that with concrete.
4. Anchor the bench to the wall. I have no idea how guys use unbolted benches or worse benches on rollers. Those guys must be a lot less energetic than me.
5. Plan your bench length and double it. I thought I was great with sixteen feet. 8 feet for metal/mechanical work and 8 feet for wood. Then my reloading setup was evicted from the house to make a mother in law bedroom. I quickly found 16 feet was insufficient.

Hope those pointers help!
Thanks! When you say a backboard do you mean like the backsplash on a bathroom vanity? Four or five inches of board up on the wall?
 

Gaujo

UZI Talk Supporter
Feedback: 10 / 0 / 1
Joined
Sep 11, 2013
Messages
4,191
Location
Raleigh, NC
Also when you guys talk about attaching it to the structure I think that's a great idea but I'm trying to understand how. Can you give me some ideas? I have a hammer drill and can put a lag bolt in but I can't think of how you would do that with a 4x4 post?
 

sniperdoc

UZI Talk Supporter
Feedback: 2 / 0 / 0
Joined
Jan 12, 2015
Messages
5,424
Location
TN
Also when you guys talk about attaching it to the structure I think that's a great idea but I'm trying to understand how. Can you give me some ideas? I have a hammer drill and can put a lag bolt in but I can't think of how you would do that with a 4x4 post?
Attach to wall studs. To attach to the floor, use threaded rods and epoxy or construction adhesive. Drill a hole in the floor and another in the bottom of the 4×4, put epoxy in the hole in the floor, insert the threaded rod. Coat the protruding part of the rod (ideally 4-6 inches) with epoxy, set the 4×4 onto it. Square and plumb the 4×4 before the epoxy sets!

PS,
Before drilling anything, take measurements, and write them down. Sketch out the position of the 4×4s if necessary.
 

heimue

Well-known member
Feedback: 2 / 0 / 0
Joined
Apr 19, 2007
Messages
567
Location
Greater ATL area - Georgia
First of all, my bench is not really doing much firearm work, but if I do then I will first clean it up and roll out a mat. 99% is automotive fabrication and woodworking.
I built it myself about 20 years ago, actually found a couple pics of "back then" when it was new.
The front is made from leftover log siding from when I built my garage.
The top is two half sheets of 4'x8' 3/4" MDF board. I abuse the $hit out of these surfaces. After about 3 years of service of turn them around and abuse the $hit out of the other side. After that, I buy a new MDF board.
Use high-strength drawer sliding hardware. The large bottom drawers with twin slides are easily rated for 200+ lbs per drawer, I use them frequently to step on them to reach high on my wall shelf. Max out the slider length to be able to pull the drawers out all the way.
Every one of the 10 legs is height adjustable with a carriage bolt, screwed into metal plates on the bottom of the legs. This way, I can straighten it out no matter what the floor condition is.

Dieter
Garage and Basement 131230 005.jpgIMG_6460.jpgIMG_6461.jpgIMG_6462.jpgIMG_6463.jpgIMG_6464.jpgIMG_6465.jpgMVC-189X.JPGMVC-190X.JPG
 

Please Visit our Sister Sites Below

Sister Board - Sturmgewehr Sister Board - MachinegunBoards


Please consider becoming an UZI Talk Supporter
Top